So you want to get into the hills, you’ve never done a munro hike before and you just want a bit of information to get some confidence that you can manage it fine. You’ll know doubt have been on Facebook and read some various posts that says you must do X, Y & Z otherwise doom awaits you! It can all be a bit daunting. So here is my starter guide.
Pick a ‘easy’ hill
While there is no such thing as an ‘easy hill, many munros are perfectly do-able for starters/families and those without experience – with a bit of common sense.
To that end these are the hills I’ve done, that providing the right weather conditions are great for starters.
- Mount Keen – My Review
- Ben Chonzie – Map link
- Ben Wyvis – Map link
- Beinn Ghlas & Ben Lawers – Map link
- The Cairnwell Munros (Càrn Aosda, Càrn a’ Ghèoidh, The Cairnwell) – Map link
- Càrn Liath (Beinn a’ Ghlò) + Bràigh Coire Chruinn-bhalgain & Càrn nan Gabhar if feeling good – Map link
- Meall Buidhe (Glen Lyon) – Map link
- Meall Ghaordaidh – Map link
- Meall Chuaich – Map link
These are just a few, there are others. Certainly enough here to get doing no matter where you plan to hike.
Plan
Weather
Firstly – the weather, it is your number one enemy if planning a day in the hills. For me the worst thing is the wind. You can wrap up against the cold, you can put on your waterproofs for the rain. But with the wind, you can’t stop yourself being blown over or being turned into a kite!
So unless you are going to head off with some friends that have experience, make sure you pick a good weather day. If in doubt, then put it off for another day. Spring weather in the hills can be especially fickle. You could head up and get glorious sun and clear paths, or you can head up and find everything is covered in snow – even when it’s really sunny!
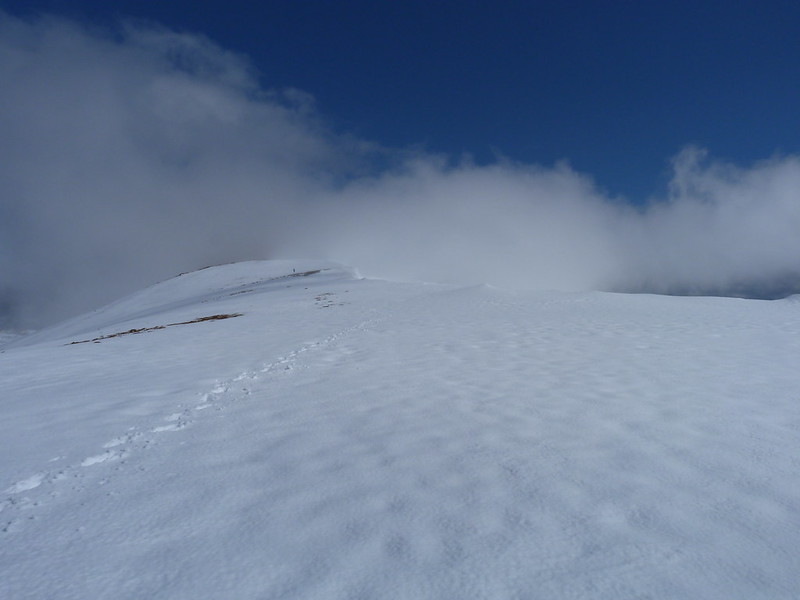

As you can see from the above, virtually the same date on different years. Both photos taken from near the summit. So watch the weather and not just for that one day. I’ve been up hills many times in Dec/Jan and there has been ZERO snow. But you can certainly get ice in winter from streams, and with that you will probably need crampons. So check the mountain weather.
My go to site is the met office as they have a special mountain forecast plus you can find out the weather on a hill by hill basis. Although mountain forecasting isn’t as reliable as normal weather forecasting, it’s pretty good. There is also the MWIS (mountain weather information service), but I’m never too keen on that as it feels a bit vague in the area its forecasting for and its very text heavy. Still it’s good to check.
Kit
You do not need a huge amount of gear, or expensive gear for that matter to get started. Many hills can be done in sturdy trainers, although I’d not really recommend that – but you could. This is because many of the popular/simple ones have great paths. Your feet may well get wet as you’ll probably have a wee stream or boggy patch to cross. Even hills with great paths can have parts where you’ll get wet feet without boots. But if you just want to get out to experience the hill then yes you can.
On a basic level it’s about taking layers for whatever the weather gives you. So you could go out an buy the £10 waterproof set of over trousers and a cheap waterproof poncho in case of heavy rain as long as you have enough warm items underneath. Now I’m not saying that’s ideal – but it’s perfectible do-able.
Gloves – take gloves! Can’t say that loud enough… TAKE GLOVES! Yes even in summer, take GLOVES!!!! If you never use them, wonderful. But if that wind picks up a wee bit and it’s a north wind and you’re on the summit, it can feel very cold.
When up the hills you’ll see runners with next to nothing with them. They travel with little clothing and little amount of gear and as long as they’re moving fast then they’re fine. For myself, I move slowly and with a reasonable amount of gear so that I can stop to enjoy the views. If you’re reading this, I’d guess you’re not about to run up and down a munro 😀

Boots – I started off with a cheap pair from Sports Direct. Karrimor ones, think they only set me back £30-40. This was essentially to see if I liked hiking. I wasn’t going to spent £100-200 on a pair of boots and end up never using them. And to be fair to the Karrimor boots they did the job. Perhaps a bit heavier and not as waterproof as the ones I have now but they were fine to get started.
Backpack – Are you going on your own or with people? If on your own you may want a bit more gear. My first backpack was a 40L one. This was more than big enough for summer walks as you don’t need to many extra layers. If you’re looking to do some in winter or when you will need more gear then a 65L one will be more than big enough. Leaving the 80L bags for wild camping and multi day trips. I’ve not purchased a bag that wasn’t suitable, so anything from the usual outdoor shops will more than likely be fine.
Poles? – Poles are a bit of personable choice. Some folk hate them, some folk like just one, others prefer two! My choice is one as I’ll generally have a camera in my other hand and having two is a bit of a nuisance. Poles are very handy for balance when crossing small streams and take a load of your knees when walking. So yeah get yourself a pair. Which ones though? Again sports direct have some good bargains here –
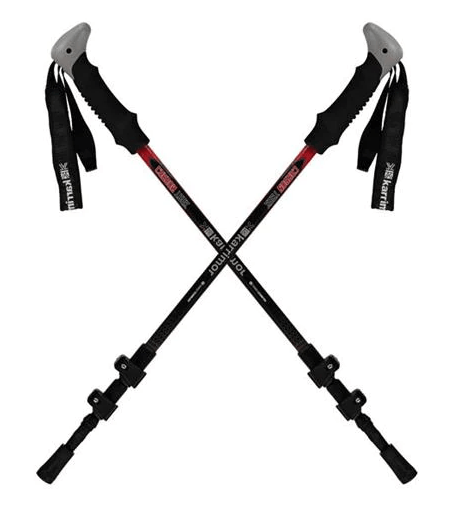
The Karrimor carbon poles are less than £40 and something like 190g. You can pay an extra £100 for other poles that are the same weight as these. I’ve used these on many hikes without issue.
Make sure to get ones that don’t have twist and lock – they are a PAIN! And more likely to break. Some will have one twist and lock portion and one clip. Get the ones with two clips – as shown here.
Food – Like most items as I hike on my own I bring myself more food than I generally eat on the hill, but it’s good to have a little extra just in case. So I always grab myself a wee meal deal from somewhere first. So a sandwich, drink and a snack. Then I’ll take a couple of extra items such as a bit of fruit and some bready or sugary snacks. For example my preference sugar sweet is fruit pastels 😀 and I’ll normally have a couple of pancakes in my box as well. More than enough for a day out. Plus I’ll always leave some snacks & juice in the car as by the time I get back to it and then reach a village the shops will be shut.
Juice – Milk is my go to liquid. So much more hydrating than water, which means you don’t have to drink as much of it – but in warm weather (haha yes sometimes Scotland has that!) you’ll need water! 1-1.5 litres will do me a trip plus I’ve got my meal deal drink. Also when you are high enough and there is a fast moving stream you can top up a water bottle direct from source. I’ve never used water tablets – but that’s a personal choice(risk). Look on your map for small streams so you know where you can get some should you need to.
Clothes – Firstly NO JEANS! Never wear jeans going hiking. If they get wet they offer zero protection from the cold. You may as well have nothing on if you have wet jeans and you’re exposed to driving wind.
So if you haven’t waterproof trousers then comfy clothes such as joggers will be fine. Make sure you have at least waterproof over trousers should the rain start or even if the wind picks up. They’ll also be windproof and often stopping the wind will be enough to keep warm. So be prepared to put them on even if its not raining.

Waterproofs are in our bags.
Same for your top. Any comfy sporty T-shirt along with a hoody/jumper and a jacket. Remember watch the weather. I’m writing this guide pretty much if I was advising a friend to go hiking on a good weather day. For your first day you should aim to make it a good weather one. Once you do more, you may want to invest in ‘special’ T-shirts etc. But general sports wear is fine underneath.
Hat – just like gloves, you may not need this, but a hat is crucial when you need it. It’s such a small extra, it would be silly not to bring one. Another little extra I do take on winter walks is a buff. Rarely use it, but something to think off once you start to do some in worse weather.
Map
Do I need a map, won’t my phone do the job? It may be fine, but to often it’s not.
so YES – take a physical copy and get a compass. Phones can easily fail and when mountain rescue are called out, often it’s because peoples phone apps haven’t worked or the phones have just stopped working, ran out of battery etc.
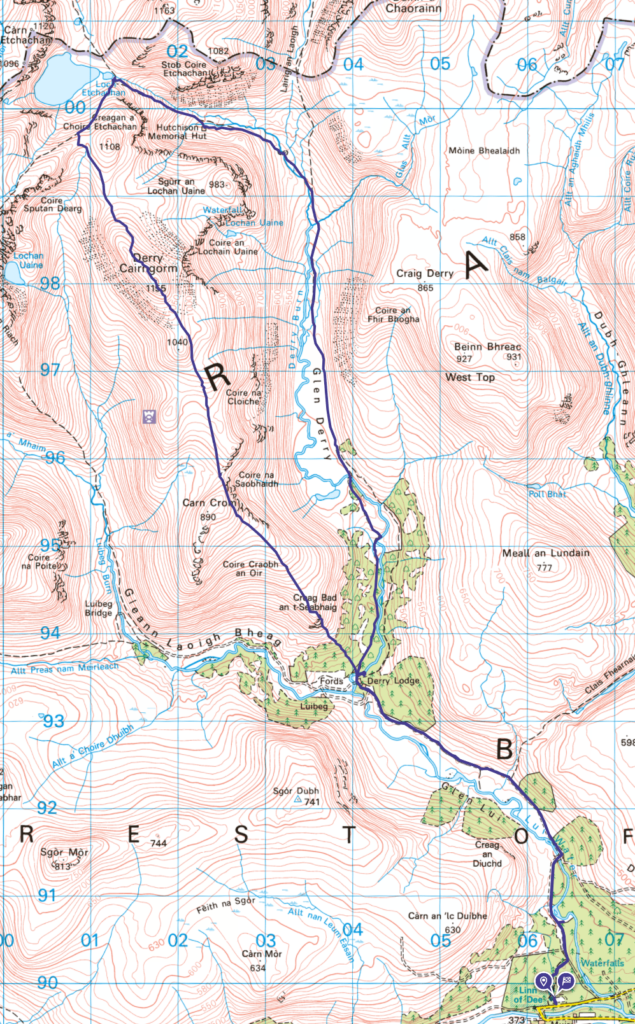
Ordnance Survey maps online are my go to place for my mapping needs. You can easily create your own route, find other routes that people have saved, or download and import GPS files (these are files that record the coordinates of a walk from a GPS device). Many walking sites contain GPX files that can be downloaded.
I’ve included a map link to each of the above hills. One of the great features of the OS maps is that you can fly through the walk in 3D, so you can have a good idea of what’s to come and what the path, hill, surroundings will look like before you go.

The cost of the online maps is as low as £24 a year, which if you plan to do 3 or more walks a year where you’d need to purchase at least one map each time is very cost effective. An individual OS physical map will cost around £7-8 (many times it’s even more). Even then you may need to two maps for a walk if your walk goes over the bounds/edge of the physical map. Whereas the online version you just print of what you want at the scale that you want.

The is the elevation chart from OS maps of the Ben Wyvis walk. As you can see it gives you some basic stats on your walk.
Time
If you use OS maps, then DO NOT go by their times! I do not understand why they do not use Naismith’s rule for hiking times, but they don’t. That rule will give you an idea of the time to walk in the hills. For your first walk though prepare to take all day! Any munro will take you at least 4 hours if walking, and probably closer to 6 minimum and for the longer ones above depending on time to stop for food etc 8-10. Look through my reviews I’ve done so far (adding new ones weekly). I list the time I take and I’m not fast! I stop frequently for photos which means I’m never straining too much.
Also if planning a longer first walk, check out sunrise/sunset times. Make sure your on time to get back before sunset. If any risk then take a head torch. A head torch is probably an extra you don’t need for a first walk. Keep it simple for the first one or two.
Extras
Take a camera! Always take a camera!
Register your phone with 999 text service! Why, well you may find yourself in a spot with very little mobile phone reception. Text messages use a network which is more widely available and it uses next to no data so is more reliable than a voice call. If you don’t register first you can’t send a text message to 999. So do it first.
Then in case of an emergency you can text 999 your coordinates. It was set up for deaf people, but is perfect for hikers 😎
Find info here or click the image below for the pdf.

App – get an app on your phone such as OS Maps. While this is no replacement for an actual physical copy, it’s good as a back up.
Compass –

I started of with a rather cheap Eurohike compass (£4) from Go Outdoors and it worked fine. Considering its really cheap compared to say the Silva ones £30+ when I broke it (not while walking) I bought another two. So I have a spare one in my bag just in case and the other one has been with me for 60-80 munros and still good.
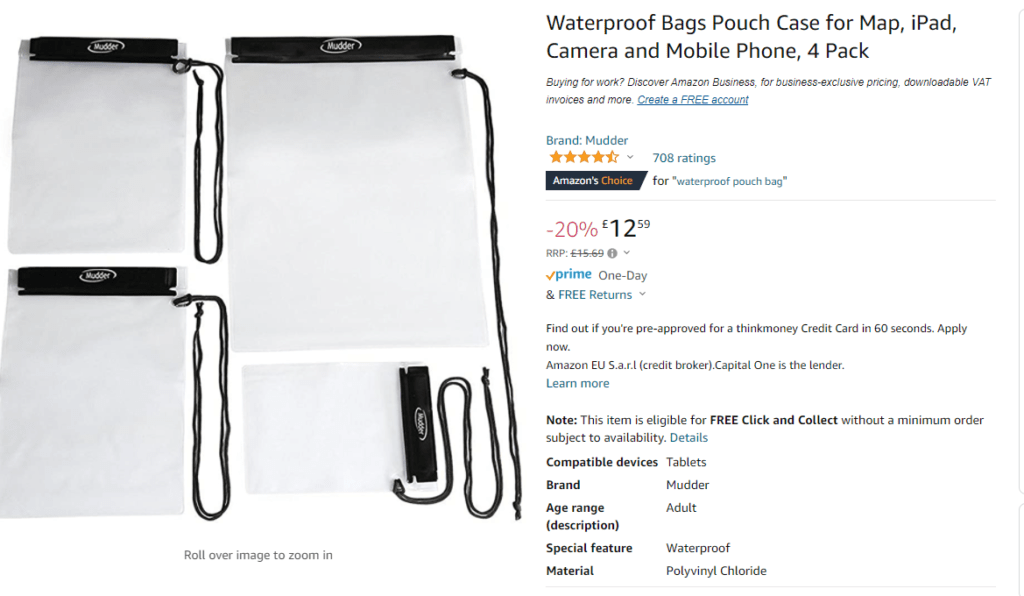
If printing your own maps with OS (or similar) then you need to make sure that the map stays dry. I use the below. Works a treat. Been in so many storms and wet conditions and not a drop of water has made it though to my map.
Finally
Enjoy and if the weather turns bad or you aren’t quite sure then turn around and go down. I’ve had to turn back a couple of times due to the weather. No harm in it, you can return when it’s better.
Once I started to head down, then questioned myself when I seen others continuing, headed back up and got blown over. Could have been bad but wasn’t thankfully. Those that past me, also ended up coming back as well in the end without completing the summit.
1 thought on “Your First Munro”